
A concrete mixer can keep turning long after the mixing tool has stopped doing its job well. The first signs are usually quiet: a longer mix cycle, material left on the drum wall after discharge, a small slurry leak at a shaft end, or a blade that has reached the end of its adjustment slot. Leave those signs until something breaks, and a simple wear-part change becomes an unplanned shutdown with damage to adjacent parts.
Scope and technical review: this guide applies to the wear parts inside twin-shaft and planetary concrete mixers: mixing arms, liner plates, blades, scrapers, and shaft wear seals. It is written by Sureay Foundry Engineer Xu Zhengnan. Use the current OEM service manual for your mixer model as the authority for clearance, torque, isolation, and any safety procedure.
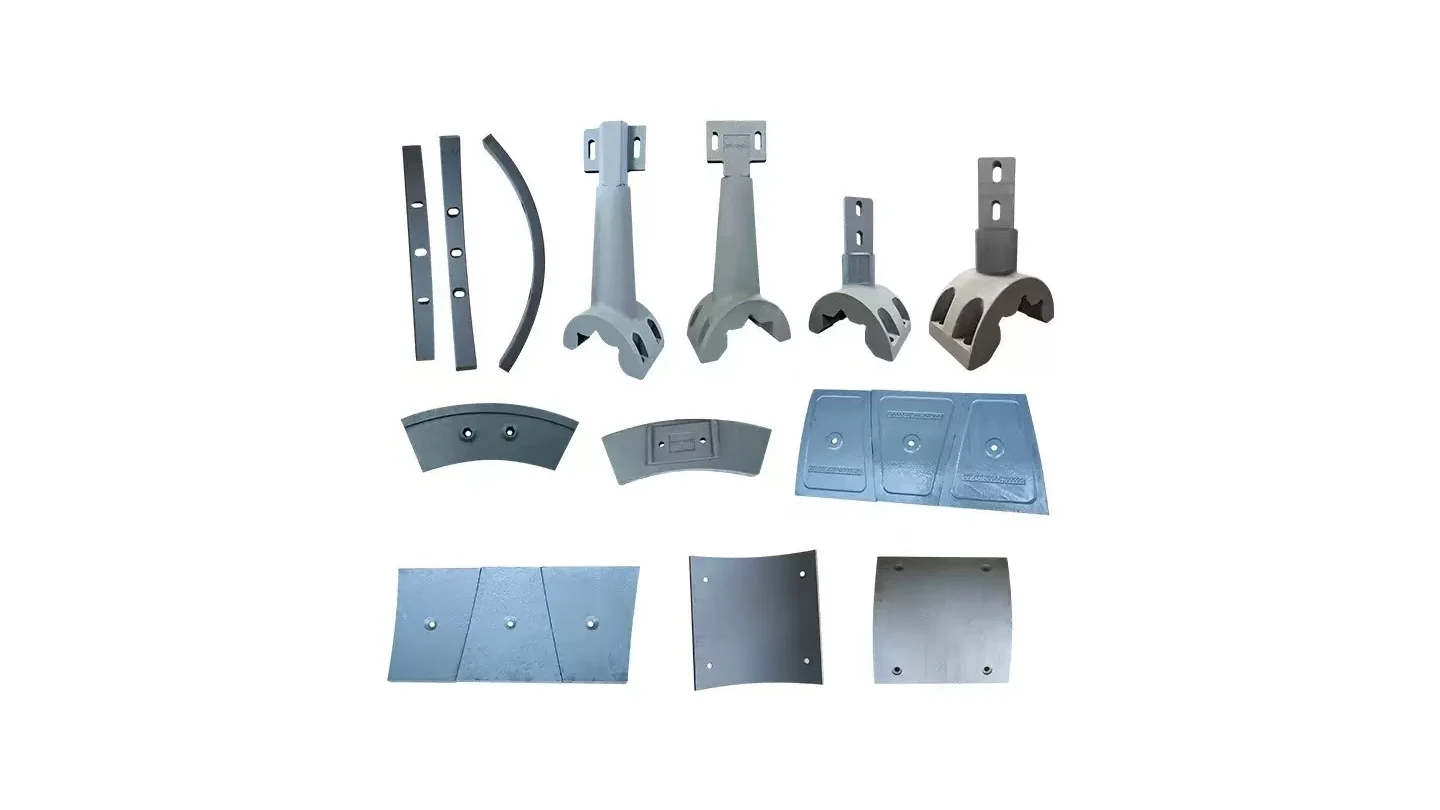
The Five Core Concrete Mixing Plant Wear Parts
Every mixer design has its own part geometry, but the functions are consistent. The arm transfers the shaft load, the blades move the batch, the liners protect the chamber, the scrapers clean the wall and floor, and the seals protect the shaft ends. A part number tells you the fit; its position in this system tells you why it wears.
| Part | Primary job | What normally ends its service life |
|---|---|---|
| Mixing arm | Carries blades and scrapers from the shaft into the batch | Fatigue cracking at the hub, elongated bolt bosses, or distorted mounting faces |
| Liner plate | Shields the drum wall and floor from aggregate abrasion | Thinning, cracked edges, loose fasteners, or a raised lip between plates |
| Mixer blade / paddle | Lifts, folds, and shears aggregate, cement, and water into a uniform batch | Rounded leading edge, lost clearance, or worn-out adjustment travel |
| Scraper | Keeps the chamber wall and floor clear for complete discharge | A widened wall clearance, rounded edge, or residue building up after discharge |
| Shaft wear seal | Keeps slurry inside the chamber and grit out of the bearing area | Weeping slurry, hardened or split seal material, or cement dust at the shaft end |
1. Mixing Arms: Check for Fatigue, Not Abrasion
The mixing arm is the structural link between the shaft and the moving tools. It sees the reversing torque of every loaded batch, so it needs toughness rather than a highly wear-resistant face. A hard iron that is suitable for a liner can be too brittle for an arm; the arm is commonly made in tough cast steel, such as ZG310-570 class material, to absorb shock instead of cracking at the hub.
Inspect the hub, shaft connection, and bolt bosses whenever blades are removed. A crack near the hub, an oval bolt hole, or a mounting face that no longer holds the blade at its intended angle is a replacement signal. Installing fresh blades on an arm with worn bosses puts the new blade out of position from its first batch and shortens its useful life.

2. Liner Plates: Protect the Chamber Before the Drum Wall Is Exposed
Liner plates are the sacrificial wear surface inside the mixer. Sand, gravel, and recycled aggregate grind against them on every revolution, so Ni-Hard and high-chromium iron are common choices for their hard, abrasion-resistant working face. The correct grade depends on aggregate hardness, particle size, output, and the amount of impact in the mixer; hardness alone is not a complete specification.
Look for uneven thinning, broken edges, loose bolts, and gaps between neighbouring plates. A single full-thickness replacement in a heavily worn row can stand proud of the adjacent plates and form a catch point for aggregate. For that reason, evaluate a liner row or high-wear section together. Replace it as a set when the remaining plates would leave a step against the new one.

Technical Note
Inspection note: do not wait until the drum wall is visible. Check liner thickness, fasteners, and seating faces together, because a loose liner can fail before the casting has reached its expected wear limit.
3. Mixer Blades and Scrapers: Clearance Is Part of the Part
The mixer blade or paddle lifts and folds the batch. The scraper works closer to the wall and floor, clearing the material that would otherwise remain after discharge. Both are abrasion parts, but their visible symptom is different: a worn blade usually appears first as longer cycle times, uneven mixing, or segregation; a worn scraper appears as residue on the chamber surfaces and incomplete discharge.
For both parts, profile and clearance are as important as material grade. As the edge wears back, the gap to the liner opens. Slotted mounting holes may provide adjustment travel, but once that travel is used, further adjustment cannot restore the design clearance. Renew the part before it begins to wear its mounting surface or the liner behind it.

| Observed condition | Likely part to inspect | Maintenance response |
|---|---|---|
| Mix cycle is getting longer or batch texture is less uniform | Mixer blades, arm mounting faces, and liner clearance | Measure edge wear and clearance; replace blades that cannot be reset to the required position |
| Concrete remains on the drum wall or floor after discharge | Scrapers, their adjustment slots, and adjacent liners | Reset clearance where adjustment remains; replace the scraper when the edge or slots are spent |
| A new blade or scraper loosens unusually quickly | Arm bosses, fasteners, and the mounting surface | Correct the worn mounting point before fitting another wear casting |
| Liner is grooved only along one path | Blade or scraper alignment | Check the tool position and arm geometry before treating the liner as an isolated failure |
4. Shaft Wear Seals: Small Leaks Need an Early Response
The shaft seal is not a cast wear face, but it is one of the most consequential service parts in the mixer. It separates wet slurry inside the chamber from the bearing area outside it. Once the seal hardens, splits, or loses its fit, slurry can escape and cement dust can work towards the bearing assembly. The seal may be inexpensive, while the bearing and shaft repair are not.
Inspect both shaft ends for wetness, packed cement, abnormal bearing noise, and uneven seal seating. A planned blade or arm shutdown is often the best time to inspect and renew a seal that is approaching its service limit, because the chamber is already open and the labour overlap is real.
Plan Replacements Around the Next Useful Shutdown
A calendar is useful for scheduling inspection, but it should not be the only trigger for replacement. Aggregate type, water content, batch volume, cleaning practice, and machine alignment make two plants with the same model wear very differently. Record the condition of each part family at every planned stop and use the trend to decide what belongs in the next maintenance scope.
| When the mixer is open for | Also inspect | Why it belongs in the same stop |
|---|---|---|
| Blade or scraper replacement | Arm bolt bosses, liner clearance, scraper adjustment travel | The tools are already removed, making alignment and mounting checks accessible |
| A worn liner row | Neighbouring liner thickness, bolts, blades, and scrapers | A new liner needs a flush row and correct tool clearance to avoid premature damage |
| Shaft-end repair or leak investigation | Wear seal, bearing-area cleanliness, and tool condition near the end wall | Early seal work can prevent slurry and cement dust from reaching the bearing assembly |
| A full scheduled reline | All arms, blades, scrapers, seals, and mounting hardware | A chamber-wide inspection lets the plant reset the whole mixing tool to one predictable wear window |
What to Record Before You Order
Technical Note
Specification note: a similar outline is not enough to prove fit. Confirm the part position, cast or OEM number, bolt pattern, curvature, and material requirement before production. Use your mixer OEM's current manual for torque values, clearances, lock-out steps, and other machine-specific instructions.
A correct replacement depends on the exact position as well as the plant make and model. Photograph the part before it leaves the mixer: show the wear face, the mounting face, cast or stamped numbers, and a dimension reference for the bolt spacing. Record whether the holes are slotted or round, the part position, the aggregate being used, and the condition that prompted the change. These details tell a supplier both how to match the geometry and whether the material grade or maintenance plan should change.
For a closer look at pattern numbers, position pads, and slotted bolt holes, see our concrete mixing plant parts reorder guide. If an OEM drawing is unavailable, a worn sample can still provide the bolt pattern, profile, and wear evidence needed to reproduce a replacement.
What are the main wear parts in a concrete mixer?
The core wear system includes mixing arms, liner plates, mixer blades or paddles, scrapers, and shaft wear seals. Arms mainly face shock and fatigue, liners, blades, and scrapers face abrasive aggregate, and seals protect the shaft-end bearing area from slurry and cement dust.
Should concrete mixer wear parts be replaced as a complete set?
Not every time. Replace parts as a set when their condition affects one another: a heavily worn liner row, for example, should be assessed together so a new plate does not stand proud of its neighbours. During a planned shutdown, inspect related arms, blades, scrapers, seals, and mounting hardware so a near-end-of-life part does not cause another stop soon after.
How do I know when a concrete mixer blade needs replacing?
Inspect for a rounded leading edge, lost clearance to the liner, and exhausted adjustment travel. Operational signals include longer mix cycles, uneven batches, or segregation. Use the machine OEM's clearance and inspection criteria as the final setting reference.
Why is my concrete mixer leaving material after discharge?
A worn scraper or an opened-up wall clearance is a common cause. Once the scraper edge no longer reaches the wall and floor closely enough, material remains behind and can harden into build-up. Inspect the scraper edge, adjustment slots, mounting hardware, and the adjacent liners together.
What information is needed to order replacement concrete mixing plant parts?
Provide the plant make and model, clear photographs of both part faces, cast or stamped numbers, bolt-hole measurements, and the quantity or position of each part. A worn sample is especially useful when the original drawing or OEM part number is unavailable.
Technical Note
Need help defining a maintenance scope? Send photos of the worn parts, the plant make and model, and the aggregate type to Sureay's engineering team. We can check fitment, review the wear pattern, and recommend a part set for the next shutdown.